Vegan Mug Brownie

Every time I make a Vegan Mug Brownie, I’m amazed at how fudgy and delicious it turns out. The texture is dense and brownie-like, not cakey, with pockets of melted chocolate and walnut crunch throughout. The dark cocoa gives it that intense chocolate flavor. It’s warm, gooey, and impossibly quick.
This post contains affiliate links. As an Amazon Affiliate, if you purchase through those links, I earn a commission. Thank you!
I make this for late-night cravings, movie nights, and anytime I want dessert without baking a whole batch. It’s perfect for single servings so you’re not tempted by leftovers, and it comes together faster than waiting for the oven to preheat. Best enjoyed warm right from the microwave.
Ingredients You’ll Need
You’ll need all the ingredients shown in the photograph below.

How to Make Vegan Mug Brownie with Step-By-Step Instructions
Scroll down for the full recipe card containing a full printable recipe and measurements in both US customary and metric units.
You’ll love how simple these vegan mug brownies are to whip up a fudgy brownie in just a couple of minutes.
Mix the Dry Ingredients
Grab a microwave-safe mug or large ramekin and add your flour, sugar, dark cocoa powder, salt, and baking powder. I like using a large ceramic ramekin because it gives a larger surface area for more even cooking than a narrow mug.
Use a fork or small whisk to combine everything thoroughly so you don’t end up with cocoa clumps in your finished brownie. Whisking the dry ingredients first ensures even distribution of the chocolate.
You can substitute coconut sugar or brown sugar for the granulated sugar for a deeper, more caramel-like sweetness, or use white sugar if that’s what you have on hand. For a gluten-free option, swap the all-purpose flour (also called regular flour) with a gluten-free flour blend, oat flour, or whole wheat flour in the same amount.
If you don’t have dark cocoa powder, you can use unsweetened cocoa powder or natural cocoa powder instead, though the flavor will be slightly less intense and the color won’t be as deep.
Add the Wet Ingredients
Pour in your vegan milk (almond, soy, oat, or any non-dairy milk works), oil, and vanilla extract. The oil keeps the brownie moist and fudgy rather than cake-like, which is exactly what you want in a good brownie.
You can use melted coconut oil, vegetable oil, or refined coconut oil instead of the sunflower or canola oil. If you’re using solid coconut oil, melt it first and let it cool slightly before adding it. If you want to use vegan butter instead of oil, melt about 1 tablespoon and use it in place of the oil for an even richer flavor.
Stir everything together until you have a smooth batter with no dry flour pockets remaining. I use a balloon whisk to ensure everything is thoroughly combined, and there are no lumps at the bottom of the mug.
Fold in the Mix-Ins
Add your vegan chocolate chips (make sure they’re dairy-free dark chocolate chips) and chopped walnuts, then gently fold them into the batter. The chocolate chips will melt into gooey pockets while the walnuts provide a nice textural contrast.
You can add extra chocolate chips for more melty pockets throughout, or skip the walnuts and swirl in a spoonful of nut butter, such as almond or peanut butter.
Microwave the Brownie
Pop your mug into the microwave and cook on high power for 60 seconds. Every microwave operates slightly differently, so yours may need slightly more or less time.
If the center still looks wet and jiggly after the first minute, microwave it for another 30 seconds. You want it set on top but still soft in the middle for that perfect fudgy texture.
Check for Doneness
The brownie should appear set on the surface but still have a slight jiggle in the center when gently shaken. It’ll continue cooking a bit from residual heat after you remove it.
Let it cool for about 2 minutes before digging in so you don’t burn your mouth on the molten chocolate chips. This vegan mug cake (with a fudgier, brownie-like texture) is one of my favorite vegan recipes because it comes together quickly.

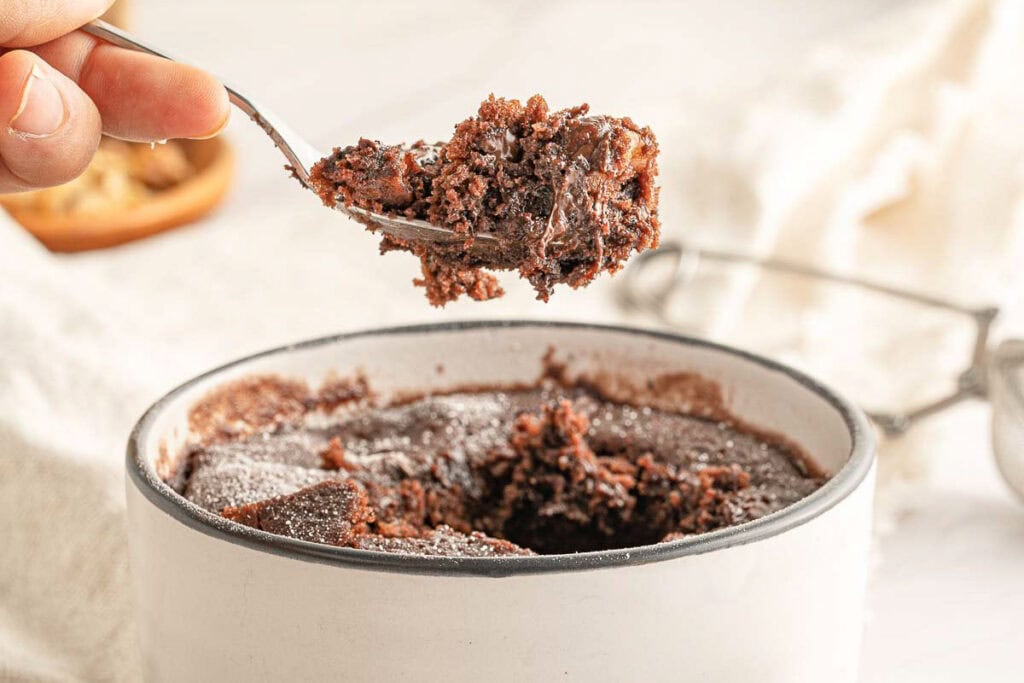
Serve and Enjoy
Let the brownie cool for about 2 minutes so you don’t burn your tongue on the melted chocolate chips. I like eating mine straight from the mug with additional chocolate chips. You can top it with vegan ice cream and drizzle nut butter over it.
Serve immediately as is while the vegan chocolate is still melty and the walnuts are perfectly crunchy against that fudgy center; perfect for satisfying your sweet tooth. Enjoy!
If you need to transport it, let it cool completely first, then cover the mug tightly with plastic wrap or aluminum foil. A vacuum-insulated food jar works great for keeping it warm during transport if you’re bringing it somewhere within an hour or two. Please ensure the lid is sealed tightly so it doesn’t spill in your bag.

Equipment
Ingredients
- 3 tablespoons all-purpose flour
- ¼ teaspoon baking powder
- 2 tablespoons sugar
- 1 tablespoon dark cocoa powder
- 1 tablespoon oil sunflower, canola, coconut
- 2 tablespoons almond milk or other plant-based milk
- ¼ teaspoon vanilla extract
- ⅛ teaspoon salt
- 1 tablespoon dark chocolate chips
- 1 tablespoon chopped walnuts
Instructions
- Place all the dry ingredients (flour, sugar, cocoa powder, salt and baking powder) in a mug or large ramekin. Whisk them together until combined.3 tablespoons all-purpose flour, ¼ teaspoon baking powder, 2 tablespoons sugar, 1 tablespoon dark cocoa powder, ⅛ teaspoon salt
- Add the almond milk, oil and vanilla extract, then stir again.1 tablespoon oil, 2 tablespoons almond milk, ¼ teaspoon vanilla extract
- Fold in the chocolate chips and chopped walnuts and stir again.1 tablespoon chopped walnuts, 1 tablespoon dark chocolate chips
- Finally, pop it into the microwave for 60 seconds at high power.
- Check the mug brownie; if it is still wet, bake it for another 30 seconds.
Notes
- Use dark cocoa powder: It yields a richer, more intense chocolate flavor than regular cocoa powder, making the brownie taste more decadent.
- Don’t overmix the batter: Stir just until the flour disappears to keep the texture tender and fudgy rather than tough.
- Monitor the microwave time: Start with 60 seconds and add 15-second increments as needed, since microwaves vary in power and you don’t want to overcook.
- Let it cool slightly: Wait 1-2 minutes before eating so the chocolate chips aren’t lava-hot and the texture sets up properly.
- Choose your mix-ins: You can swap walnuts for pecans, add peanut butter chips, or use white chocolate chips instead of dark for different flavor combinations.
- Storage tip for meal prep: If you want to prep the dry ingredients ahead, measure them into a mug, cover with plastic wrap, and store at room temperature for up to a week so you can just add the wet ingredients and microwave when you’re ready.
Nutrition
How to Store Leftover Vegan Mug Brownie
You can keep the brownie at room temperature for about a day if you cover the mug with plastic wrap or transfer it to a glass food storage container to prevent it from drying out. For longer storage, refrigerate in an airtight container for up to 3 days.
The texture becomes slightly firmer when cold, but 15 seconds in the microwave restores the warm, gooey consistency. I don’t recommend freezing mug brownies, as they’re best enjoyed fresh and are quick to make from scratch when a craving hits.
What to Serve With Vegan Mug Brownie
I usually eat it straight from the mug with a spoon while it’s still warm, but you can dress it up if you want. A scoop of vegan vanilla ice cream on top creates an amazing hot-and-cold contrast, or drizzle peanut butter over the warm brownie and let it melt.
Fresh raspberries or sliced strawberries cut through the richness nicely if you want something fruity alongside. Some people add coconut whipped cream, but honestly, it’s plenty rich on its own.
More Easy Recipes for You to Try at Home
You’ll love these other easy vegan dessert recipes.